Showing posts with label DIY. Show all posts

Friday, December 14, 2012

Friday Favorites

Kitchen Accessory - Nespresso Milk Frother from Crate and Barrel


Christmas Decoration - DIY Pinecone Owls


Cold Weather Fashion - Fur Coat and Skinny Jeans:  Bethany Joy Lenz and her daughter Maria


TV Show - One Tree Hill


Quote (From my favorite show just to go along with a theme that seems to be going on)


Friday, July 22, 2011

Baking, Reading, and DIYs

Baking...
I made a coffee cake!  I used a basic coffee cake recipe and added about 1/2 cup of sour cream to make it more creamy.  It turned out very good and the good thing was that my dad liked it probably more than all of us.  That is surprising because my dad is not one to eat homemade food.  I know, completely opposite from me, but the fact that he liked it says something!
Mixing in the sour cream


Reading...
I am still reading Spoken From The Heart!

DIYs...
#1  I needed to still unpack all of my jewelry from moving back to California.  I had nowhere to put it and it was time to figure something out.  So I found an old cork board in my sister's old closet.  I covered it with some extra white fabric I had and just tacked on the back.  The fabric was actually left over from some curtains I cut from Ikea.  So the fabric on the board matches my curtains.  I used tacks and hung my jewelry throughout the board.  I added a fabric flower I made a couple weeks ago to the corner to add some flair!  THis project only took about 30 minutes.

#2  This next project was a little more involved.  So I wanted a bedside table that would fit in my room really well, was very practical and cheap!  The cheapest one I could find that I liked was from Ikea for $40.00.  I was opposed to spending that much money but I was hoping to find something else.  I went to Micheal's and got some ideas white I was there.  This is what I came up with.
The items...
- 1 sturdy basket which was on sale and was the perfect size to store books but not big enough to get cluttered
- 1 small square piece of wood
- 2 long wood decorative border pieces
- 1 small bottle of white paint
- 1 bottle of light yellow paint
- 1 large fake decorative flower
Here is the finished project with help from my dad!

Painting the square piece

Waiting for the paint to dry

Finished project!

The beautiful flower I couldn't pass up!


Other Fun Things...
#1  Adorable new Tea Pot and matching cup from Cost Plus World Market!  


#2  To go with my new tea pot I bought some tea which should be here in the next few days.  I bought the tea online at Teavana.  I bought Cacao Mint Black Tea and Cocoa Praline Tart Rooibos Tea.  They are both dessert teas which are perfect for me and my sweet tooth!  I will let you know how they are when I get them!

#3  My to dos for the weekend...
-  Get hangers to for the rest of my clothes!  I have no where to put them and my room is too messy.
-  Bake chocolate and pecan scones
-  Wash my car
-  Finish cleaning my room
- Read, exercise, and have fun!!

My mom is in Wisconsin until tuesday and boy do I miss her!  I love her so much  :)

Sunday, July 17, 2011

Small Updates

A few things I have been doing lately.....

Finishing invitations for my cousins baby shower that I am throwing for her!

I made some wonderful scones!  I got the recipe HERE!  They are from one of my friends blog.  I used whole wheat flour and dark chocolate chips.  They turned out great!
To make them last longer, I wrapped them individually in plastic wrap and put them in the freezer.  In the mornings, I would take one out and put it in the microwave to warm in up.  That worked perfectly!
Before they go into the oven

All done and delicious!
I picked some beautiful roses from the garden!

I also noticed that my cat found a new bed in our flower pot!

Other than these things, I have just been working a lot and spending time with family and friends.  I am planning on doing some more baking this week so look for that!
Currently reading:  Spoken from the Heart(still, because it is so long) and Charlotte's Web
New fave website:  pinterest.com

Sunday, December 12, 2010

DIY Christmas Gift 12


This is a fun gift for kids and thought I would post it.  
HAT AND MITTENS!
It wouldn't be spin to describe this craft as ridiculously easy. Although in some ways that's exactly what you do with a Knitwit: spin (well, wrap) thread around a circular or square-shaped tool to create loopy rosettes. Rendered with luxurious yarns such as mohair, these florets look decidedly modern. 
To determine how much yarn you'll need per rosette, follow this rule of thumb: Winding once around the tool requires two yards, winding twice requires three yards, and so on. The Knitwit kit ($20, knitwit.com) comes with instructions, so we've limited the how-tos to our modifications.The basic technique involves wrapping the yarn and then twisting the tool's stem to release the floret with a satisfying pop. 
Hat and Mittens How-ToMake your little one's winter wear even cozier with rosettes. These call for angora, wrapped three times each. To attach them as earflaps, first put on the hat (high on the head). Hold the rosettes to cover the ears, and mark the position. Use the same yarn and a needle to stitch the earflaps to the hat. To embellish the mittens, affix florets at their centers and at each knot (you'll know where they are from the Knitwit instructions) around the perimeter.
Editor's Tip Creating these blossomlike designs calls for a different kind of holiday wrapping. Wind thread around a Knitwit, knotting at each loop with a needle. For thicker yarn, use a tapestry needle; for thinner, a sewing one. To alter the "pattern," play with thread type and the number of times it's wound around the tool.

Saturday, December 11, 2010

DIY Christmas Gift 11


Polka-Dot Pillows      Trace a glass, compact disc, or quarter or silver dollar; or use your computer to make paper patterns for circles of different sizes. Cut out patterns, pin to the fabric, and every polka dot will be perfect.
Use a whipstitch around the edge of fabric that won't unravel, such as the wool felt dots seen here.

DIY Christmas Gift 10


I am sorry this is a bit late but I hope you still enjoy :)
Striped Soaps How-To
1. Melt the glycerin according to the package instructions, using 1/4 cup at a time.

2. Stir in a drop of peppermint oil (available at most health-food stores) with a plastic spoon; for the clear glycerin, add drops of red food coloring, stirring until you get the desired hue.
3. Pour the 1/4 cup of melted soap into the loaf pan. Let cool for 20 minutes.
4. Score the top with a fork. Repeat, alternating colors, until the pan is full.
5. Let set for 4 hours. Pop soap out of pan, and slice into bars.

6. Wrap each bar in cellophane; tape it shut, and tie with bakery string.
7. Cut holly-leaf tags out of green construction paper.

Thursday, December 9, 2010

DIY Christmas Gift 9


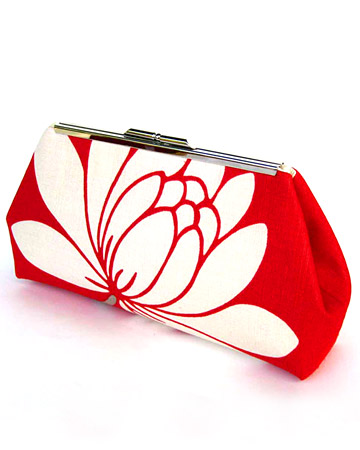
Clutch
Tools and Materials
  • Decorative fabric for outside of clutch
  • Fabric for lining
  • Heavyweight fusible stabilizer
  • Fusible fleece
  • Rotary cutter
  • Grid ruler
  • Iron
  • Sewing machine
  • Coordinating machine-sewing thread
  • Transparent tape
  • Bond 527 Multi-Purpose Cement
  • Metal clutch frame hardware
Clutch How-To1. Cut 13-by-13 1/2-inch pieces from outer fabric, lining fabric, and heavyweight fusible stabilizer. Cut a 10 1/2-by-13-inch piece of fusible fleece. With an iron, fuse heavyweight stabilizer to wrong side of outer fabric, then fuse fleece to center of stabilized side of fabric.
2. With right sides of outer and lining fabrics together, sew 1/2-inch seams along both longer 13 1/2-inch edges.
3. Turn sewn pieces so right sides are facing out, and press seams flat.
4. Fold in half, matching seams at top, with lining on inside. Sew a 1/4-inch seam on outside raw edges, then trim seam allowances to 1/8 inch and snip in at the corners. Turn again, so outside fabric is on the inside. Sew 1/4-inch seam along edges, creating a finished French seam, then turn right side out.
5. Fold corners down; mark and sew a 2-inch gusset on each. Trim corner to 1/8 inch. Turn again so lining faces out; sew a 1/4-inch seam along gussets to finish seams. Turn right side out one last time.
6. Apply a bead of fabric glue to metal frame. Center over top seam, carefully insert fabric in metal frame, and secure in place with tape. Allow glue to set for several hours.
7. Remove tape, tuck outside corners behind frame, and snap closed.

Wednesday, December 8, 2010

DIY Christmas Gift 8


Bath Fizzies 
Tools and Materials
1/2 cup citric acid
1 cup baking soda
3/4 cup cornstarch
1/4 cup organic cane sugar
About 6 drops food coloring
10 to 15 drops essential oil(s)
Special equipment: 2-ounce travel-size spray bottle, plastic pipette, silicone ice-cube tray, storage jars
Directions
1. Stir together citric acid, baking soda, and cornstarch in a glass measuring cup.
2. Pass mixture through a fine sieve or a flour sifter into a mixing bowl. Stir in sugar.
3. Fill spray bottle with water, and add food coloring. Spritz mixture lightly (it should become damp but not fizzy) until you can pack mixture with your hands.
4. Using pipette, add oil, 1 drop at a time, until strength of scent is to your liking. Using a metal spoon or your hands, mix ingredients until color is even throughout (mixture will begin to dry out; when this happens, spritz until packable again).
5. Spoon into ice-cube tray, pressing firmly. Let dry at room temperature overnight. Pop out of tray gently. Transfer to jars.

Tuesday, December 7, 2010

DIY Christmas Gift 7

Button Jewelry
Like a charm bracelet — only much less expected — this button-trimmed beauty is blessedly easy to make. Amy Barickman'sButton Ware (Indygo Junction) spells it all out: Start with a link bracelet (a nickel-plated version with a toggle clasp costs $1.19 at crystalcorners.com), 40 to 60 buttons with shanks (those small loops protruding from the backs), an equal quantity of jump rings,and a pair of needle-nose pliers. For each side of each link on the bracelet: Pry one jump ring open with the pliers, then thread the ring through both the button's shank and the link itself, and use the pliers to pinch it closed again. Repeat until the chain's transformed and ready to wear.

Monday, December 6, 2010

DIY Christmas Gift 6

Jewelry  Magnets 
Instead of letting vintage brooches gather dust in your jewelry box, turn them into refrigerator magnets: Use a pair of needle-nose pliers to remove the pin hardware from the back of each brooch (most fittings will come off easily); then affix a superstrong magnet with a small bead of glue — we used Gorilla Super Glue. Let dry overnight. Your grocery list has never looked more glam!

Sunday, December 5, 2010

DIY Christmas Gift 5

Fabric Covered Boxes
INSTRUCTIONS: 
1. Lay your box on the fabric to determine how much you need (allow 1/2 inch of overlap all around). Cut two pieces of fabric -- one to cover the outside of the box (including lid) and one to cover the inside. 
2. Fold the 1/2-inch hems over and press to crease; unfold. 
3. Fold fabric into corners again to determine fit; trim if necessary. 
4. Fold the corners over at 45 degrees and press; unfold. 
5. Cut the corner diagonally along the crease. 
6. Lightly apply glue to the inside of the box. Press the fabric on firmly, smoothing out any wrinkles. Let dry and repeat for the outside of the box.


Saturday, December 4, 2010

DIY Christmas Gift 4

I thought these homemade wallets were really cute and wanted to share!


Printable directions HERE!!!


Friday, December 3, 2010

DIY Christmas Gift 3

Make your own Candles!


Things you need:

  • 1 lb Soy Wax
  • 1/3 ib beeswax
  • Chosen crayons for coloring or candle dyes
  • Candle moulds(old tea cups, etc.) or dixie cups(for non container candles)
  • Pure fragrant essential oil
  • Pencil or a stick
(With the above ingredients about four to five Dixie cups sized candles can be made)


Method:

  • Thread a piece of wick at the bottom of the mould, Dixie cup or the container that you are using as the mould and wind the excess thread to the pencil
  • Rest the pencil horizontally across the mould
  • Melt soy wax and beeswax in a double boiler.  Boil it up to only 180 degrees and not more
  • Once the wax is melted, add shavings of beeswax crayons or candle dye into the wax.  More crayons added will produce the smell of crayon when the candle is made
  • Add the fragrant oil into the wax and blend
  • After blending, pour the wax into the mould an allow it to set for 24 hours for best results
  • Peel the mould off when the candle is ready.
(If you do not have a double boiler, use a pan with water and insert a clean can in the middle)

Thursday, December 2, 2010

DIY Christmas Gift 2

HOT COCOA MIX IN A JAR!
Ingredients:
1.  6 cups instant nonfat dry milk
2.  1 1/2 cups granulated sugar
3.  1 cup and 2 tablespoons Nestle toll house baking cocoa
1 1/2 cups miniature marshmallows
Directions:
Combine ingredients into 2-quart jar or tall container.  Seal with lid and decorate with fabric and ribbon.  Attach recipe to the jar.... Measure 1/2 cup cocoa mix into mug.  Stir in 1 cup hot water or milk.  Makes 12 servings.

Wednesday, December 1, 2010

DIY Christmas Gift 1

I thought it would be fun to post a DIY Christmas gifts for every day before christmas.  I am a broke college student(and also just really enjoy crafty things) so I love things like is!  Here is the first  :)


Braided Dupioni Silk Necklace

Dupioni silk in sherbet shades has a lovely luster. When you tear the fabric into strips, it frays, giving this braided necklace a soft, fringed look.
TOOLS:
Dupioni silk, New York Elegant Fabrics, 212-302-4984.

WHAT TO DO:
Rip dupioni silk into 1-inch-wide strips; 1/2 yard makes 3 necklaces. Knot ends of 3 strips, and braid. When you get to the end, hand-stitch additional fabric strips onto the first 3 (stagger the new additions if possible to disguise the seams). Continue braiding to the desired length (our necklaces are as long as 60 inches), and knot. Knot ends together to make a loop.